Friday, August 26, 2016

Using Resin with Creative Paperclay


Using Resin with Creative Paperclay (CPC)


Here are the supplies needed for this tip.
1. PVC Pipe
2. Amazing Cast or other resin product
3. Focal Point Picture
4. Book
5. Plastic Knife
6. White Liquid Glue
7. Creative Paperclay


Roll out the CPC using PVC Pipe & use a template to cut out & place CPC on top of
book.

Mix the Amazing Cast Resin following instructions on the bottles.
The resin will take at least 24 hours to fully cure.

Wednesday, August 24, 2016

Creative Paperclay Landscape (part 2 of 3)

This is part two of a three part series.  Click here to read part one.


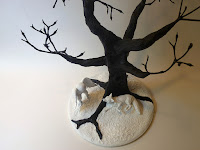
Creative Paperclay (CP) is a great material for creating landscapes.  If you are making a diorama, a theater set design or need a setting for your sculpture, you may want to consider creating a landscape.  The landscape surrounding a finished sculpture will add atmosphere to reflect or contrast the mood you are creating.  A well-made landscape can stand on its own as a finished sculpture.

In this series of articles, we will put together a complete landscape utilizing three basic elements by building a base, a tree and rock.  We will then look at ways of incorporating our landscape with other sculpted pieces.


TREES
creative paperclay figures in landscape

Nothing says landscape like a tree.  Most people have a lot of respect for trees.  Once you add a tree to your sculpture, the entire piece suddenly becomes very important and dramatic.

A lot of artists like making trees out of wire which allows them to place every branch exactly where they want.  The effect can be dramatic, but I don't like working with wire.  It's hard to cut and I always get cut on the sharp edges.

When I make a tree, I like to go outside and find some small branches.  I'm lucky to live near a tree whose branches grow in interesting designs (I hope my neighbor doesn't read this...).


Take three or four branches that look good together and arrange them in an interesting treelike way.  Remember, first and foremost, you are THE artist, so get artsy with it.  Once you find an arrangement you like, wrap the branches with some masking tape to hold them in place. 


If the tree looks too short or not significant enough, you can give it a boost by taping some strips of cardboard at the bottom which will form the trunk when we start adding CP to it.


Try placing your tree in different parts of the base you made in Part 1 of this article and look at it from different angles until you find a position you like.


Now the fun part!  You can use CP to bulk up the trunk and main branches to fill out your tree.  You can add texture for the bark or keep it smooth.  You can tie the tree to the land by adding roots.  To give the tree a natural look, make the trunk, branches and roots curve and twist.


Don't keep everything in straight lines, unless of course, that is the look you want.


Here is a short video showing how easy it is to craft a tree!


link to kevin whitham saatchi art online


You can visit me on Facebook.


Tuesday, August 23, 2016

Aged Creative Paperclay® and Found Objects


As a mixed media artist, I love combing found objects, paint, collage and Creative Paperclay® to tell a visual story.


SUPPLIES

Creative Paperclay®
Acrylic paint
Salt
Stamps
Water
Art Surface
 I start by applying Creative Paperclay® to my art surface using a brayer to have a flat border. I prefer to work on cradled wood panels. The paper clay was stamped, sanded with SandIts then cut out the shape of this beautiful escutcheon at the Flea market.


When the clay was dry, I coated it first with polymer medium. When that dried I painted a base coat of Red Oxide acrylic paint.
I then coated it with Irridescent Bronze acrylic paint.
Next, I added washes of Micaceous Oxide and Red Oxide acrylic paint. Salting each layer and letting dry before repeating with another color. Yes, good old table salt. The salt will stick to the paint and give the surface a gritting, old look.

Dream in Color!

Darlene Olivia McElroy


Sunday, August 21, 2016

Lynda's Altered Box

I get a lot of boxes - and hate to throw them away!  I have a desk that holds most of my creative stuff - along with a few other small pieces which holds other small pieces that is!  Since I have all these boxes - I decided to alter one, using molded flowers using the Delight product!!!  

Supplies used:
Priority mail box 
Stampin' Up papers and cardstock
Stampin' Up white bakers twine
Sizzix vine and flower die cut
Flower mold
Delight product
Border punch

Bakers twine
Luminart Paint - Sunflower and Rose Gold
 
**Tip - make sure to find molds you will use a lot, and make up a bunch of them ahead of time!  This way - when you need them, they are made and ready to go!!!  

Directions:
Step one:  Start with the box and cut the flaps from the top of the box.  


Step two:  Start with the papers for the inside with the bottom first - then the 2 small sides, finishing with the 2 longer sides.  

Step three:  Add the outside papers - starting with the small sides first - then the longer sides.  


Step four:  Cut a "V" on each corner - to allow for the paper to be folded down to the inside.  Make sure you use adhesive to glue it to the inside to hold it down.

Step five:  Take a white sheet of cardstock - measure to just a bit smaller than the side of the box - border punch around the top and bottom edge.


Step six:  Take the vine die cuts and the flowers (I used two for each flower and layered) - and add them to the front on top of the white sheet from step five.  


Step seven:  Paint the already molded (and dried) flowers in the Sunflower and Rose Gold to go on top of the flowers - 2 of each color.  Then take 2 small flowers, paint in Sunflower and 1 larger one and paint in Rose Gold - add to bottom corner.  

Step eightFinish with the bakers twine going around the whole box and making a bow at the front!         


Step nine:  Add your scrapbook/creative items to the inside of the box and get ready to make more!!!   

Great to simply add things you are working on - at the time you need them, putting away when you simply do not have the time TO do something...  Plus you can simply grab a new box and alter it as you change designs or you find a new paper design you want to use!  Make more than one using one printed and solid pack that coordinates!   I know this will help me get very organized, keeping out only what I need at the time!  Easy project - can be used for so many things and so many rooms!  
Lynda Jeffs
Creative Paperclay Design Team 2016       

Tuesday, August 16, 2016

Make a Mandrake with Glowing Eyes

Of course it's not too early to start working on Halloween decorations!  This year one of the "themes" of the Halloween party is going to be a spooky/haunted garden, so we started making mandrakes.  These are so simple and fun to make, we might have a whole greenhouse full before Halloween.


To create your own you will need:

Delight™ air dry modeling compound
an empty clear plastic bottle
scissors
fake foliage
white glue
acrylic paint
gallon size plastic bag for mixing clay and paint, if desired.  You can just mix it with your hands if you prefer
LED tea light
newspaper or stuffing of some sort to support the bottle during sculpting
planter with dirt


Start by cutting off the bottom of the bottle, I cut mine at an angle so it would sit back a bit in the pot.


Next mix the modeling compound with some acrylic paint until you get the color you prefer.  I mixed burnt umber and brown in part way and decided I wanted to leave it with the mottled look.


Stuff some newspaper or stiff paper into the bottle to keep it from collapsing while you work on it.  Roll or squish the clay flat in the baggie, then pull off sections and apply to the bottle.  If you have a problem with the clay sticking to the bottle, apply a layer of white glue to bottle and allow it to get tacky before adding the clay.


Cover the bottle completely - you might want to put it on a tile or piece of cardboard to stick it down before sculpting the face and adding foliage.


Use bits of clay to build up and sculpt the face, and add extra clay for arms or hands.  Remove clay from the inside are of the eyes (and mouth, if you like) so the light will shine through.

Cut foliage into individual stems, then insert them into the top of the bottle and put clay around them.  Again, if you have trouble with the clay sticking, use some white glue.


 I am making the hands separately to make it look like the mandrake will be climbing out of the pot. The hands for this one are just roughly sculpted from rolled clay to (hopefully) give them appearance of roots.


When everything is dry, brush a layer of acrylic wash over the piece to bring out the sculpting.  Turn on the tea light and place it in the planter, remove the stuffing from the bottle, then "plant" the mandrake over top of the light and push some of the dirt around the base.  Obviously, I went with a different pot than the one I used for sculpting, since my daughter had made one that fit the clay pot better and I thought mine looked better in this one.


Here they are together and with a few extra decorations


Thanks for joining me here again!  As always, play, experiment, and have fun!

Tori West

Find me on Facebook, or peruse & ponder pics with me on Pinterest

Friday, August 12, 2016

Portrait Collage - Becky's First DT Post

Self-Portrait Collage by Becky Conley
Every few years, I like to create an art piece from a self-portrait. Creating this piece was therapeutic, while reflecting on life events, I was able to just play. Play with colors, textures and composition. 
 
SUPPLIES:  Creative Paper Clay
Acrylic Paint: Golden rod, Brown, White
Watercolor paper: 11x14 Bonjour Studios
 Variety of Silicone Molds: Butterfly, (After Midnight) Leaves, Fern (Artists Own)
Gold Pigment Powder, Stream Color Mist: Ranger Ink
Chipboard Letters 2": Maya Road
Self Adhesive Bling Flourishes, Amber: Zva Creative
Liquid Glue: Aleen's Tacky Glue 
Other: small scissors, photo/PC/printer, Bowl of water and a few drops of liquid dish soap, straw, paint brushes and large tweezers.

INSTRUCTIONS:
1. I created a myriad of molded shapes, rolled and cut shapes with texture added from a rubber stamp. I wanted a variety to choose from, but I did not use them all. Allow ample time for your pieces to dry. 
2. Print the portrait image onto the watercolor paper. Mine is printed in Sepia.
3. Dry brush the background with all three acrylic paint colors: brown, golden rod and white using random strokes vertically and horizontally, mixing in some areas and overlapping others.
4. Select dried clay pieces and placement on your background. Adhere them with liquid glue.
5. Spritz blots of color mist over the clay pieces and a few areas on the background. Let dry, or heat set.
6. Dry brush the clay pieces with any or all three acrylic paint colors.  Add any touch ups to the background as desired.
*as you can see by the butterfly piece near my chin, the spray mist can be quite dark.  I lightened those areas with white and goldenrod acrylic paint as well as step 7.
7. Highlight the clay molded pieces and some background areas with gold pigment powder by brushing or dabbing.
8. Paint the chipboard letters with white acrylic paint, let dry.
9. To guarantee a more subtle application of the Stream color wash to the letters, put a few drops of dish soap into a small bowl of water. Blow bubbles with a straw, then spritz with color wash.  Use long tweezers to dip the letters into the colored bubbles.  Let dry.  Apply the chipboard letters to the background with liquid glue and brush a few small areas with gold pigment powder.
 10. Cut the bling flourishes to fit areas of your project and apply them to the background.

I had such fun creating this project!  I hope you might try a self portrait collage too.
Dream and Create.
-Becky

Secret Book Box

Secret Book Box 

Ever since I received my 1st design team package, I have been trying to figure out how I could use the Delight air dry compound. I found a wooden book box in my supply inventory and I decided to use this product on it with a stencil.


I added the Delight to the book box.


I placed a stencil on top of the project and use a PVC piper to create the impression on the front and back sides of the project.


I used a border stamp to add the design to the spine of the project. You can use any border stamp that you like for this step.


Then I added acrylic paint. I didn't see any need to use gesso. Delight and the wooden book box both can be purchase at Michael's or through Amazon. This is a great project that works for all skill levels.