Friday, August 30, 2013

Blue Bird


I have a very small collection of blue birds.
Since it is so rare that a new one is added, I thought I would use some Creative Paperclay ® 
to create my own addition.

Supplies:
Creative Paperclay ®
paper towel
sandpaper
gesso
mod podge
sponge brush
paint brush
acrylic paint
additional decorations

1.  First, I balled up some paper towels for the body of my bird.
Then I formed Creative Paperclay ® around it into the shape of a bird.
2.  Let dry. Remember this takes some time. I tend to cover it loosely with plastic for a day or so.
Then I take it off so it can dry completely. This helps cut back on cracking and breaks.


3.  Then, sand your piece.


4. Next I seal it with Gesso. I like having a seal before I decorate my pieces.


5.  Using acrylic paints, I mixed a pretty blue color up.  When you are mixing your own color, make more than enough to cover your piece in case you need touch ups and second coats.

6.  Use Mod Podge to seal your design.  Again, feel free to apply a couple of coats.


 7.  Don't stop there.  Why not add accent baubles or frilly designs in paint pen?
I was thinking about doing that.  But I loved the simple shape...and so I stopped. 


This is my new favorite part of my Blue Bird Collection.
Though, I now want to make a few more and over embellish them!
What can you make out of Creative Paperclay ® to add to your collectables?

Thanks for visiting us today. 
Tweet!

Dawn Mercedes, of Sunnyside Up


Tuesday, August 27, 2013

Barbara's Creative Paperclay® August Tips and Techniques

Hi everyone. Barbara here with my monthly tips and techniques to share with you. Today's tip is also a bit of a technique, and I actually made this discovery while trying to fix a boo boo. Funny, but I think a lot of ideas come from the need to fix something that did not quite work out. Reminds me of that old saying, "Necessity is the mother of invention".

 So, here is what happened. I was teaching a group of ladies how to use Creative Paperclay®, and we were using all different sorts of things, like molds, texture sheets, stamps, or our own creative imaginations. I opened a brand new package of Creative Paperclay®, which was very moist. We were rolling out bits of Paperclay® onto various texture sheets and removing the clay to air dry. Some of the texture sheets were finer than others, such as this honeycomb texture plate. Needless to say, one person got overly anxious and did not wait until the clay had time to dry out a bit before removing it from the mold. What happened next? Well, she pulled up the clay and left the design in the texture plate.

 Here is where necessity took over, in my mind. The way I saw it, I had two choices: 1) take the texture plate and a stiff brush to the sink and, under running water, scrub away the clay; or 2) roll another piece of clay over the same area and see if it will stick to the clay already "stuck" in the texture plate. I chose to try number 2. Because the clay was so moist, it worked. (If the clay was a bit more dried out, then I would have added, or spritzed, a bit of water between the two layers to get the same effect. Remember, water is like glue to Creative Paperclay®.)  Well, much to my surprise, it worked!!!
However, I made yet another discovery during this process. As I said, I left the clay to dry in the mold and, where I had not covered the "stuck" clay, some of the open design from the texture plate pulled off, too. Here is the result, shown in a couple of close-ups.  I was so amazed to see that even the open parts of the clay came up, too.

 Now, guess what I want to do next? I want to see if I can get an open honeycomb design by spreading a thin layer even with the surface of the texture plate. After allowing it to dry thoroughly on the plate, I want to see if I can remove it without breaking it into a million pieces.  You can see in the photo below that it is thinner in some spots than in others, but you can see the texture of the plate coming through.  I knew it was not going to be completely open, but it is all about experimenting.
Oh my goodness!  It worked again.  You can see in the photo below where I was able to get more open design area from a much thinner application.  And much to my surprise, it is very durable, and even more exciting, it is extremely flexible, unlike my piece above, where I spread it about 1/4" thick.  After all, it is paper in clay form.  How cool is that?
Well, you can imagine the ideas running through my head with my new discovery.  I know, some of you more experienced Paperclay® artists may already know this, but, just in case, I had to pass it on.  I am so excited to share this with anyone out there who does not know this.  I can see so many possibilities and cannot wait to see what else I can discover about this wonderful product.

So, please stay tuned to see what I have in mind for all these honeycomb pieces.  It should "bee" a real treat.  In the meantime, I hope you will visit the Creative Paperclay® online store and blog for products, updates, and more inspiration from the rest of the Design Team.  I also hope you will take a moment to visit me at my blog at Black Hole Art Studio.

Thanks for stopping by, and have a wonderful end of Summer!

Barbara Rankin
Creative Paperclay® Design Team Member

Friday, August 16, 2013

DawnMercedes' August tip!


Here are some tips on how to save left over Creative Paperclay ®!


Supplies:
water bottle
Cling Wrap
Clear Packing tape
ziplock bags
a wad of left over Creative Paperclay ® or Delight ©


1.  I tend to take small amounts out of the packaging at a time so the bulk of my Creative Paperclay ® still in the packaging.
2.  Knead left over clay together to ensure that there are no air bubbles left inside the wad.
If the wad seems dry, I will spritz it with water as I knead it to give it more moisture before storing.


3. Tuck it back inside the original packaging.  Use clear packing tape to close up the thick plastic.
4.  Wrap entire package in cling wrap.


4. Place this package inside of a ziplock bag. You  may want to double bag it.

**Remember for each layer, squeeze out the extra air.**

But I suppose THE BEST WAY ..
is to just use it all up. 
That way, the next time you design, you can start with a fresh package!

Thanks for stopping by today!
Dawn Mercedes, of Sunnyside Up

August Tip from Rachel Whetzel

When you create pieces using  Creative Paperclay®, and you are trying to avoid using a lot of clay, a handy trick is to build up your piece with filler. The thing is, that sometimes when you use filler, you can create a less sturdy piece if your surrounding clay because your clay is thinner, or the piece you're making has connecting parts that create weak spots. One way to help create stability inside your pieces is to create a skeleton of sorts at the core of your piece. One way that I do this, is to use screws. Click on any of the following pictures to be taken to the tutorial for that project.
Circus Dog Project
Garden Gnome Project
Mad Hatter Tea Party project
Once you have secure bones, it's safe to create filler for your piece using the same technique I have shown in my Gnome and Egg projects, and with a sturdy and durable foundation, it's easy to create whatever you fancy! Using screws is a great way to make good bones for your projects.

Thursday, August 15, 2013

Jess B. - Masquerade Mask Part II

Hello Everyone,

Since my last posting I've come to discover the my littlest one, Kymora, age 4, wants to be more involved with my projects.  I don't have a door to my craft room and as much I express Do Not Enter, it just goes right over her little head.  Kymora decided to play with my mask and the rest is history.

I cannot get too mad at her as she is inquisitive. If she wants to express herself artistically why not.
I created a new mask and let her paint, glitter, and bling out the other one.

MASQUERADE MASK PART II
Once it was completely dried, I began rolling out
more Creative Paperclay® and used Lisa Pavelka - Simple Elegance Border Mold

With a cup of water and paint brush to applied the border and used the
heat gun to help me adhere quickly. 
I sprayed Adirondack Color Wash Red Pepper and Tsukineko Walnut Ink
Heat gun dry again and used the hot glue gun to give it more texture.
 
 I used silver rub-n-buff and Color Box Gold pigment ink
INGREDIENTS
Lisa Pavelka - Simple Elegance Border Mold
Ranger - Adirondack Color Wash - Red Pepper
Tsukineko - Antiquing Solution - Walnut Ink
Hot Glue
Rub-N-Buff - Silver
Color Box - Gold Pigment Ink

I hope this inspires you to create one for yourself.
The possibilities are endless.
Here is another piece I am working on

Thanks for stopping by

Tuesday, August 13, 2013

Bird on a Nest Inspiration Piece

Hello Creative Paperclay® fans, and welcome back.  As some of you may know, I really love birds.  I think they are cute little creatures and simply fascinate me.  So, I wanted to try to see if I could make a bird out of Creative Paperclay®.  Well, I am no sculptor, but I think I made a pretty good effort with this, and I can tell it is a bird and not some other strange blob unknown to man.   Just more proof that Creative Paperclay® is a fabulous product to work with and very easy to manipulate.


Supplies Used:

Large wooden spool (2" tall)
Fast Grab Tacky Glue (Aleene's)
Clay/Metal embossing mold 
Acrylic paint (Greenscape, Tahiti Blue, Straw. Coral Blush, Classic Green)
Distress ink (Vintage Photo, Dusty Concord)
Acrylic paint dabber (Lavender Sachet) (Ranger)
Gilder's Paste (Cream)(Baroque Art)

Directions:

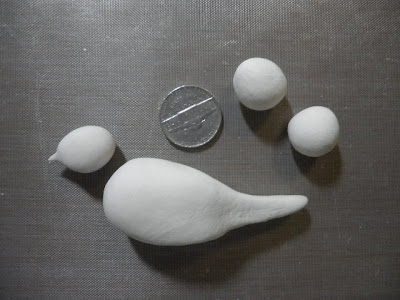
I first rolled out a ball of CP® about the size of a golf ball, maybe a bit smaller.  You can always add or remove some, if necessary. 


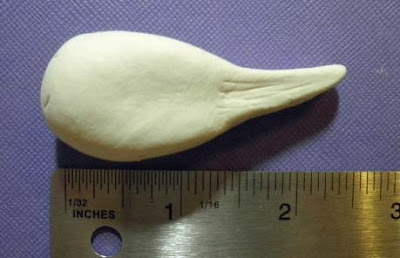
 I made three more balls of CP® as shown in photo below, one for the head, two for the wings.  Next, I made the body shape, flattening from the top and bottom, and pinching one end to bring out the tail feathers portion.  I also flattened the sides a bit to attach the wings later.


Use a straight edge to make "feathers" in the bird's tail portion of the body.


Flatten two of the smaller balls with your fingers to form wings.  Pinch the ends to bring out to a point.  Keep these fairly flat while working on them.  Also, remember to mirror image them so they will  sit in the proper direction.  Otherwise, one will be backwards.  


Lay the wings on top of each other to check for size.


Use a needle tool or straight edge to make the "feathers" in the wings.  


For the head, pinch one end to bring out the beak portion and manipulate it until you like it.  Before it dries, I punched a tiny hole on either side for eyes, and drew a line between his beak for his "lips".  


Set all of your pieces aside to dry.  The body is rather thick and may take several days to dry completely, so plan ahead for this project.  


To determine the circumference of the wooden spool, simply wrap a piece of paper around the spool and mark where the paper meets, in this case it is 4".  This will be the length of CP® you  need to roll out.  


The height of the CP® is simply the inside measure of the spool between the top and bottom edges, about 1-5/8" in this case.  These measurements do not have to be precise now, because the CP® can be trimmed and manipulated as you work with it onto the spool.


Ink wooden spool edges with Vintage Photo.  This gives the wood a nice brown, aged effect.


Roll out a ball of CP® approximately 1/4" thick, wide enough and long enough to go around the spool.    I made a paper template to size to make it easier to see where to cut my CP®.  


Cut out around the template and dry fit it around the spool.  Here you can see I am a bit shy, so I gently rolled my piece a bit more just to stretch it in length only.


Ahhhh, just right.  Now I can use my fingers and a bit of water to smooth out those edges where the CP® meets.  


I spread if bit of tacky glue over the back of the CP® to make it stick to the wood while I work on it.


Next, I rolled the clay-covered spool over a border mold to get this wonderful design.  Just take your time and press the spool into the clay as you roll it.  


I used a plastic clay tool (use whatever you have) to refine the mold border edges that formed when I rolled the clay over it.


While the clay on the spool is drying, I painted my bird pieces with acrylic paints.  


Glue the bird's body parts together with the quick grab glue.  Set aside for the glue to dry.


Paint the molded images on the Paperclay®.  It is okay to go outside the lines because it will get covered up in the next step.  Allow paint to dry.


I used the lavender paint dabber to cover most of the outside of the spool, being careful not to color the flower images.  As you can see in the photo, this color is not strong enough to cover the dark colors underneath.


Using my finger to apply the Cream gilder's paste gave the coverage I needed and left a bit of the lavender color showing through.  


I further distress inked with Dusty Concord to bring back even more of the purple color and bring out that beautiful crackle effect.


Run a thin bead of gold pearl pen along the ridges made in the Paperclay®.


The bird nest is made from small 2" squares of natural burlap, pulling all of the threads apart and balling them up into a circle.  


When you get it shaped the way you like, glue it down to the top of the spool.


Add tiny black beads to the eyes and glue the bird on top of the burlap bird nest.


Voila!  Is that not cute?  I love my bird on a nest spool.  This is going to be an inspiration piece for me, and it will always take me to a happy place when I look at it.


I hope you have been inspired to try making your very own inspiration piece with Creative Paperclay®.   It is a fabulous product, and it accepts so many different mediums, which allows you, the artist, to try out all of them.  

Thanks for stopping by today, and please be sure to visit the online store and blog for more information on this wonderful product.  I would also love for you to visit my blog to see some of my other creations.

Have a wonderful, creative week!

Barbara